Drag-and-drop interfaces make web applications interactive, intuitive, and user-friendly. From task boards like Trello to custom file uploaders, drag-and-drop is one of the most requested features in web development.
In this tutorial, I’ll guide you through creating a complete drag-and-drop interface with vanilla JavaScript, without using any frameworks. You’ll learn how to:
- Handle drag events efficiently
- Swap elements dynamically
- Provide visual feedback to users
- Make your interface accessible and responsive
By the end, you’ll have a reusable, lightweight drag-and-drop module for your projects.
HTML Structure
Start with a simple container and draggable items:
<div class="container">
  <div class="draggable" draggable="true">Item 1</div>
  <div class="draggable" draggable="true">Item 2</div>
  <div class="draggable" draggable="true">Item 3</div>
  <div class="draggable" draggable="true">Item 4</div>
</div>
Explanation:
draggable="true"enables native drag-and-drop for the element..containeracts as the parent for all draggable items.
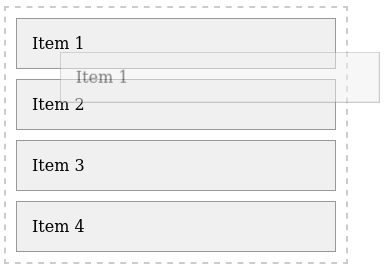
Result:

Styling with CSS
Add styles and visual feedback for dragging:
.container {
  width: 320px;
  padding: 10px;
  border: 2px dashed #ccc;
  display: flex;
  flex-direction: column;
  gap: 10px;
}

.draggable {
  padding: 15px;
  background-color: #f0f0f0;
  border: 1px solid #999;
  cursor: grab;
  user-select: none;
  transition: all 0.2s ease;
}

.draggable.dragging {
  opacity: 0.5;
  border: 2px dashed #333;
}
Tip: The .dragging class gives a clear visual cue that the element is being moved.
Result:
Core Drag-and-Drop Events in JavaScript
We’ll use five main events:
dragstart: triggers when dragging beginsdragend: triggers when dragging endsdragover: allows droppingdragenter: optional, can highlight drop zonesdrop: triggers when the dragged element is released
const draggables = document.querySelectorAll('.draggable');
const container = document.querySelector('.container');

let draggedItem = null;

draggables.forEach(item => {
  item.addEventListener('dragstart', () => {
    draggedItem = item;
    item.classList.add('dragging');
  });

  item.addEventListener('dragend', () => {
    draggedItem = null;
    item.classList.remove('dragging');
  });
});
Implementing Dynamic Swapping
We want items to swap live as you drag:
container.addEventListener('dragover', e => {
e.preventDefault(); // Necessary to allow drop
const afterElement = getDragAfterElement(container, e.clientY);
if (afterElement == null) {
container.appendChild(draggedItem);
} else {
container.insertBefore(draggedItem, afterElement);
}
});
function getDragAfterElement(container, y) {
const draggableElements = [...container.querySelectorAll('.draggable:not(.dragging)')];
return draggableElements.reduce((closest, child) => {
const box = child.getBoundingClientRect();
const offset = y - box.top - box.height / 2;
if (offset < 0 && offset > closest.offset) {
return { offset: offset, element: child };
} else {
return closest;
}
}, { offset: Number.NEGATIVE_INFINITY }).element;
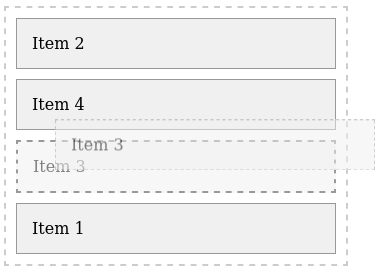
}How it works:
getDragAfterElementcalculates where to insert the dragged element based on the mouse’s vertical position.- As you drag, the elements automatically swap, giving real-time feedback.
Result:
Accessibility and Edge Cases
- Keyboard users: Consider allowing arrow keys to reorder items.
- Touch devices: HTML5 drag-and-drop doesn’t work natively; use
pointerevents for mobile. - Prevent accidental text selection: Done with
user-select: nonein CSS.
Pro Tip: Always provide visual and ARIA feedback for accessibility.
Optional: Persisting Item Order
Keep the order after page reload using localStorage:
window.addEventListener('beforeunload', () => {
  const order = [...container.children].map(child => child.textContent);
  localStorage.setItem('dragOrder', JSON.stringify(order));
});

window.addEventListener('load', () => {
  const order = JSON.parse(localStorage.getItem('dragOrder'));
  if (order) {
    order.forEach(text => {
      const el = [...container.children].find(child => child.textContent === text);
      container.appendChild(el);
    });
  }
});
Result:
See the Pen Draggable Items by Arnold Gunter (@arnoldgunter) on CodePen.
Final Touches and Optimizations
- Add smooth transitions for better UX:
.draggable {
  transition: all 0.2s ease;
}
- Consider animations on drop, shadows, or color highlights.
- Test across browsers and devices to ensure reliability.
Conclusion
You now have a fully functional, lightweight drag-and-drop interface using vanilla JavaScript:
- Works without external libraries
- Supports live element swapping
- Easy to extend with touch and keyboard support
- Can persist order with
localStorage
This pattern is perfect for task boards, interactive lists, or file uploaders. Once mastered, you can scale it to React, Vue, or Angular projects, combining native JS with framework-specific components.

Leave a Reply